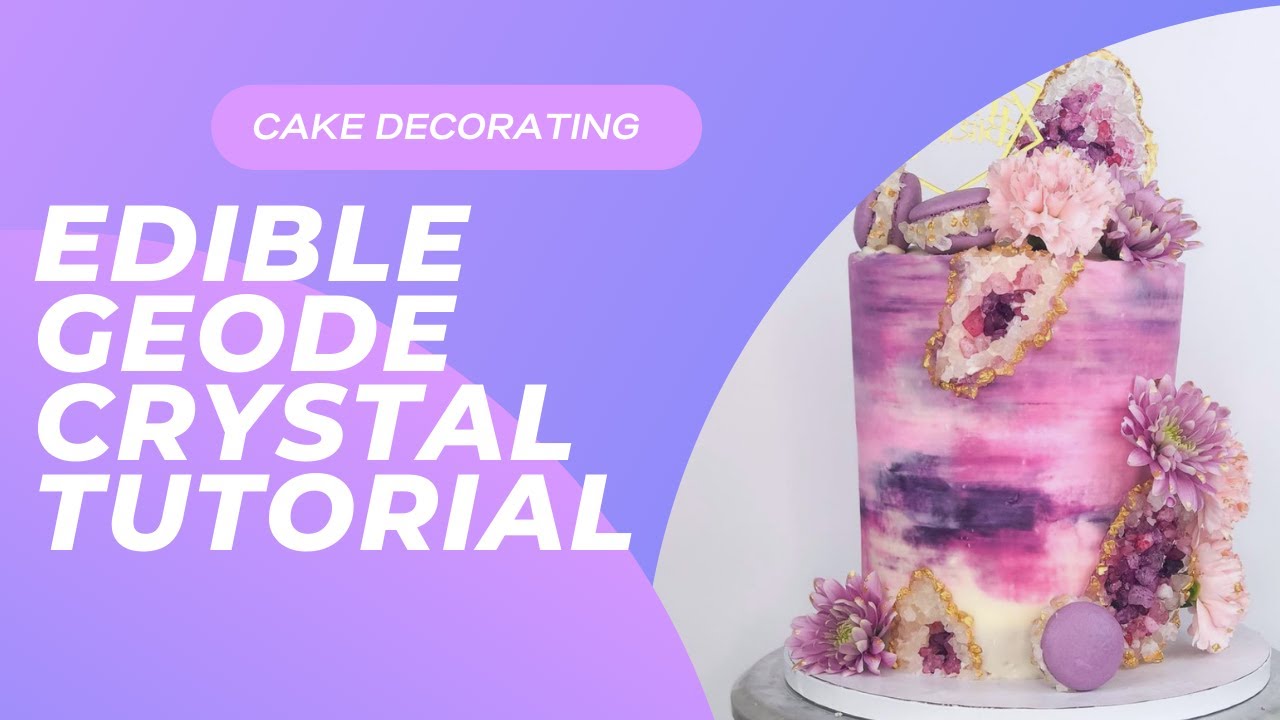
Edible crystal cake decorations are stunning and easy to make. These decorations can turn any cake into a masterpiece.
Creating edible crystal cake decorations involves simple ingredients and techniques. Whether you’re a baking newbie or a seasoned pro, you can make these beautiful, sparkly additions with ease. Imagine dazzling your guests with a cake that looks like it came from a high-end bakery.
In this guide, we’ll explore the step-by-step process to craft these eye-catching decorations. With a few basic supplies and some patience, you’ll create edible crystals that shine. Let’s dive into the world of edible crystal cake decorations and elevate your baking skills.

Credit: www.youtube.com
Introduction To Edible Crystal Cake Decorations
Cake aesthetics matter a lot. A beautiful cake makes any event special. Edible crystals add a magical touch. They look like real crystals. These decorations are also safe to eat.
Importance Of Cake Aesthetics
A pretty cake makes people happy. It shows care and effort. Cakes with decorations are popular on social media. They get more likes and shares. A well-decorated cake can be a centerpiece at parties.
Benefits Of Edible Crystals
Edible crystals are easy to make. They are also cheap. They look stunning on cakes. You can use them for many designs. They fit well with any theme. Kids and adults love them.
Credit: chelsweets.com
Gathering Ingredients And Tools
Get sugar, water, and food coloring. Use clear vanilla extract for flavor. You also need corn syrup. It helps crystals form better. A few drops of lemon juice can help too.
Use a medium saucepan for cooking. A candy thermometer is key. You also need a baking sheet with parchment paper. Measuring cups and spoons are essential. A wooden spoon for stirring is good. Lastly, get a heat-resistant spatula.
Preparing The Sugar Mixture
First, you need to measure the sugar. Use a cup to measure. Make sure the measurement is exact. Then, measure the water. Use the same cup for accuracy. Finally, you need some corn syrup. Measure it carefully.
Combine the sugar, water, and corn syrup. Stir them in a pot. Place the pot on the stove. Heat the mixture over medium heat. Stir until the sugar dissolves. Don’t let it boil. Keep stirring for a clear mixture.

Credit: wilton.com
Creating The Crystal Solution
Heat water in a pot until it starts to boil. Gradually add sugar to the boiling water. Stir constantly to help the sugar dissolve. Keep stirring until the sugar is completely dissolved. A clear solution means the sugar is dissolved. Turn off the heat and let the solution cool. Avoid lumps by stirring well.
Choose your favorite flavor extract like vanilla or lemon. Add a few drops to the sugar solution. Mix well to spread the flavor evenly. For colors, use food coloring. Add a drop at a time until you get the desired color. Stir thoroughly to mix the color. Bright colors make the crystals look amazing. Let the solution cool completely before using.
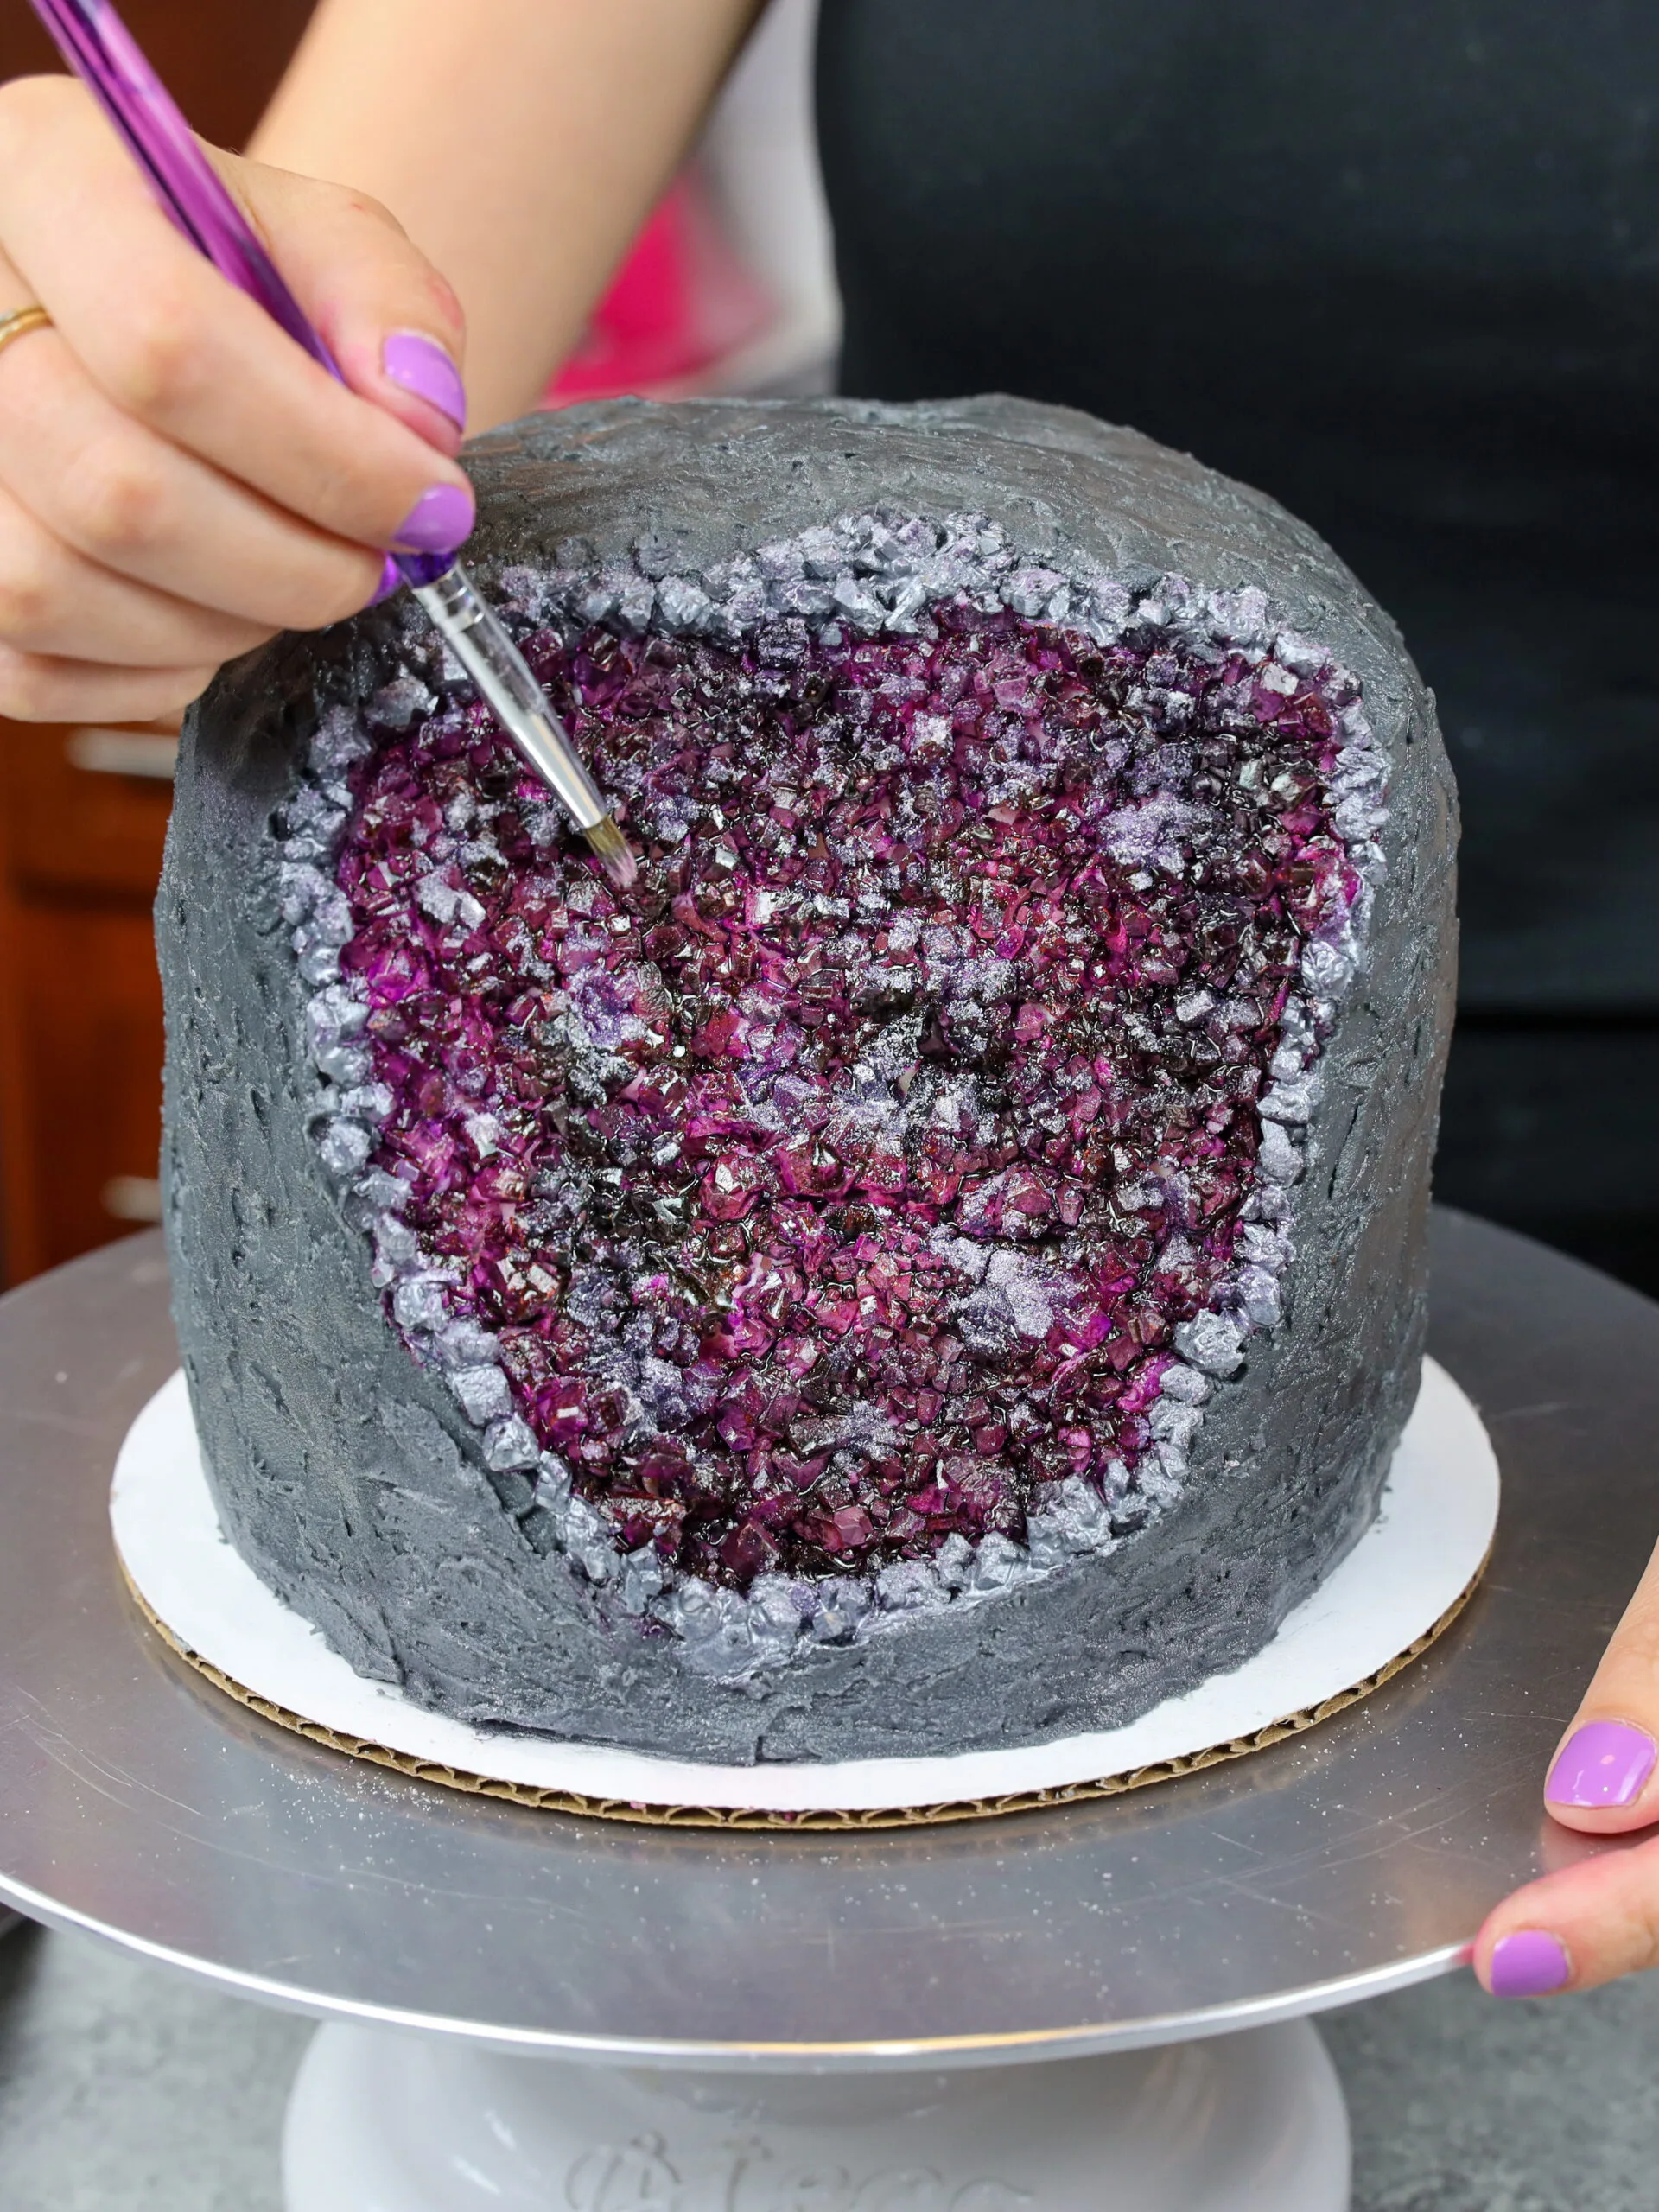
Forming The Crystals
Use silicone molds for the best results. They are flexible and easy to handle. Clean the molds before use. Any dirt can affect the shape of crystals. Place the molds on a flat surface. This helps the crystals form evenly. Pour the sugar solution into the molds. Fill them almost to the top. Leave a small gap. This prevents spills. Let the molds sit undisturbed. Movement can ruin the crystal formation.
After setting the molds, allow the crystals to grow. This process takes time. Be patient. Keep the molds in a cool, dry place. Avoid direct sunlight. Light can affect crystal growth. Check the crystals daily. They will start to form in a few days. Do not touch them. Touching can break the crystals. Once the crystals are fully formed, remove them carefully. Be gentle to avoid breaking them. Dry the crystals on a paper towel. They are now ready for your cake.
Drying And Handling Crystals
Drying the crystals is very important. Place them on a clean tray. Make sure they do not touch each other. Let them dry in a cool place. Wait for 24 hours. Check if they are completely dry. If not, give them more time. Dry crystals are easier to handle.
Crystals are delicate. Handle them gently. Use clean, dry hands. Touch them as little as possible. This keeps them clean. Store them in an airtight container. Keep them away from moisture. Moisture can make them sticky. Use tweezers if needed. This prevents damage.
Decorating The Cake
Place the edible crystals gently on the cake. Start from the top. Work your way down. Position them in a pattern. Use different colors. Create a stunning effect. Make sure the crystals are dry. Wet crystals may slide off. Arrange them close together. Avoid large gaps. This will look more polished. Be creative with your design. Have fun while decorating.
Use a small amount of frosting. Dab it on the back of each crystal. Press the crystal onto the cake. Hold it for a few seconds. This helps it stick. Repeat this process. Continue until all crystals are secured. Check for loose crystals. Press them again if needed. Ensure they are firmly attached. This prevents any falling off. Your cake will look beautiful and neat.
Tips And Troubleshooting
Many people use too much water. This makes the crystals soft. Not using enough sugar is another issue. The crystals won’t form well. Stirring too much can also cause problems. It can break the crystals. Not letting the solution cool enough is another mistake. The crystals need time to grow.
Use a clean glass jar. This helps crystals form better. Measure ingredients carefully. Too much or too little can ruin the crystals. Let the mixture cool slowly. This helps the crystals grow larger. Be patient. Good crystals take time. Store your decorations in a dry place. Moisture can ruin them.
Storing And Preserving Decorations
Store edible crystals in a cool, dry place. Keep them away from sunlight. Use airtight containers to protect them. Plastic or glass containers work best. Label the containers with dates. This helps track freshness.
Edible crystals can last a long time. Proper storage is key. They can stay fresh for months. Check them regularly for any signs of spoilage. Moisture can ruin crystals. Avoid storing them in damp places. Keeping them dry ensures longer life.
Frequently Asked Questions
How Do You Make Sugar Crystals For Cake Decorating?
To make sugar crystals for cake decorating, dissolve sugar in boiling water. Let it cool slightly. Add food coloring if desired. Pour the mixture onto a baking sheet. Allow it to crystallize overnight. Break into pieces and use for decoration.
What Do You Use To Make Edible Cake Decorations?
We use fondant, gum paste, edible ink, and edible glitter for making cake decorations. All materials are safe and food-grade.
How To Make Geode Crystals At Home?
To make geode crystals at home, dissolve alum in hot water. Pour solution into a container, add food coloring, and insert a porous rock. Let it sit for several days to form crystals.
How Do You Get Edible Paper To Stick To A Cake?
To stick edible paper to a cake, lightly brush the back with water. Carefully place it on the cake surface. Press gently to remove air bubbles. Avoid using too much water to prevent dissolving the paper.
Conclusion
Creating edible crystal cake decorations is fun and easy. These crystals add beauty to any cake. Your guests will love the unique touch. You can make them in different colors. Follow the steps in this guide. Practice makes perfect. Soon, you will impress everyone.
Enjoy your baking journey!